Introduction to making Cricut leather bracelets
Making a Cricut leather bracelet is a fun project for both beginner and advanced crafters. Depending on how customized you want to make it, it can be simple and quick, or more involved. You can get some beautiful results if you experiment with leather dye and different finishes.
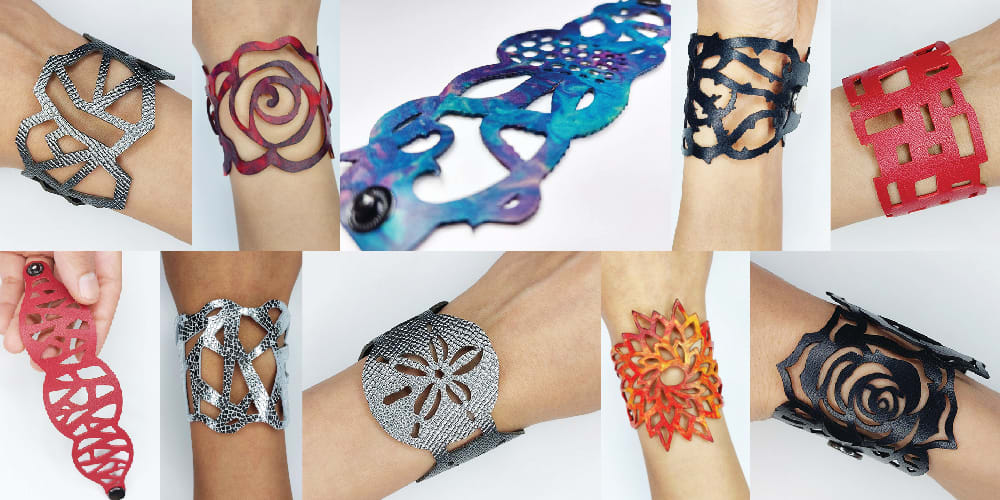
Here are some examples of bracelets I’ve made from leather using my Cricut Maker. Because you need only a deep-point blade, you can make these bracelets with both the Cricut Maker and the Cricut Explore. You should also be able to use Silhouette cutting machines.

I’ve outlined the basic overview process in the sections below, but each section links out to more resources with detailed tutorials for each step. I hope you enjoy the process and love the results as much as I do!
Here are some examples of bracelets I’ve made using this process. See their pages for more info on each specific project.
Step 1: Choose the right leather for your Cricut leather bracelet
Your Cricut machine can cut leather! But not all kinds will cut well. Deciding what type of leather to use for your bracelet is about three main factors. You need to figure out how you want your bracelet to look. You also need to consider what your cutting machine is capable of cutting. Finally, you’re limited to what leathers you’re able to get your hands on.
- Choosing the right leather for your Cricut leather bracelet – Learn about the different factors you should consider when choosing the right leather for your Cricut leather bracelet.


Step 2: Get the right file type for your Cricut leather bracelet
It can be overwhelming figuring out which types of files will work with your Cricut.
- Getting the right file type for your Cricut leather bracelet – Learn which types of files will work with your Cricut cutting machine, and where to find design files for your leather bracelet.
Here are some free bracelet design files you can download from this site (or see all free bracelet designs by filtering for bracelets):
These ones are premium designs that you can get from my Etsy shop for a few dollars:
Step 3: Size your bracelet design file correctly for your wrist
You want your bracelet to fit your wrist, or the wrist of whomever will be wearing it.
- How to correctly size your Cricut leather bracelet – Learn the best way to measure your wrist, and to resize the bracelet file so that it cuts in the correct size for a good fit.


Step 4: Cut leather with your Cricut to create your leather bracelet
4a. Find the right settings for your particular leather
Before you cut your leather bracelet, it’s a good idea to run some tests to find the correct settings to get the best cut. Learn how to do this the easy way, and download a great test file and tracking sheet to help.
- How to cut leather with your Cricut part 1: Cricut settings to start with – Check a quick-reference table to estimate Cricut cut settings based on how thick your leather is.
- How to cut leather with your Cricut part 2: Finding Cricut settings for leather – Work through a step-by-step tutorial to run test cuts and find the right Cricut settings for your particular leather.


4b. Cut your leather bracelet with your Cricut machine
It’s time to cut your Cricut leather bracelet! Learn how to set up your material on the cutting mat to minimize mess, and then get cutting!
- How to protect your Cricut mat when working with leather – Learn how to protect your Cricut mat when using leather with your Cricut.
- How to cut leather with your Cricut part 3: Cutting your Cricut leather project – A step-by-step tutorial on how to set up your cut in Cricut Design Space, get your material loaded, and get cutting.


Step 5: Dye your leather bracelet (optional)
If you’ve used unfinished vegetable tanned leather, you may want to dye your bracelet to another colour.
Tip: Dyeing will not work on finished leathers unless you strip them of their finish first. When you buy your leather, check with the vendor that it is unfinished and that it can be dyed if you plan on dyeing it.
- Dyeing leather bracelets: An illustrated step-by-step guide – Learn how to dye your Cricut leather bracelet in this simple step-by-step tutorial (with pictures).


Step 6: Finish your leather for a more professional look (optional)
If you dye your leather, you’ll want to condition and seal it to lock in the dye and bring back suppleness to the leather. You can also complete this step if you’d like to clean up the fibers on the fleshy side of your bracelet. These finishing touches will also make the bracelet look more polished and professional.
- Finish your leather to enhance your Cricut leather bracelet – Learn how to finish your leather bracelet in this step-by-step tutorial (with pictures).


Step 7: Add bracelet closures to your leather bracelet
You’ll need to add a closure so that you can secure the bracelet around your wrist.
- How to add leather bracelet closures: Snap fasteners – Learn how to add snap fasteners to your leather bracelet.


Step 8: Take care of your leather bracelet to keep it in great condition
To get the most out of your new leather bracelet, be sure to take care of it properly.
- How to take care of leather jewelry: Tips to help your jewelry last – Learn how to take care of of your leather bracelet so that you can wear your bracelet for many years to come.


Finished bracelets: Some examples
Learn more about some of the Cricut leather bracelets I’ve made using my Cricut Maker. Includes info and pictures of how I made each bracelet, and images of the finished product in all its glory.


